We’ve been using Channels DVR to allow us to record and pause/rewind/fast forward live TV associated with our Locast, AT&T TV Now and Philo streaming accounts for the past two years.
The one thing we weren’t really happy with was the numbering scheme that Channels uses. I had hoped to be able to re-map the channel numbers to something I’m more familiar with, notably the DirecTV numbering scheme (to match our AT&T TV Now account).
The Channels developers are greatly responsive to customer suggestions. They let me know that channel mapping was on their roadmap, but not any time soon. That led me to look for (or potentially write my own) solutions.
PHP to the Rescue
To solve this, I ended up writing my own PHP application to take the Channels DVR streams as an input, change the channel numbers, and send them out as a M3U playlist.
The kicker: Channels DVR also has the ability to use a M3U playlist as a source. The output from my channel mapping application can then be fed back into Channels with the new channel numbers.
Docker Keeps Everything Organized
Channels DVR provides their own Docker image that can be used to run the actual DVR server. I’ve been using it for the whole time I’ve been running Channels, so that’s nothing new to me. The idea I had was to use that Docker image to create two separate instances of Channels running on the same server.
Multiple Channels DVR Instances For The Win
The first one (or back end) would take my sources (Locast, AT&T TV Now, and Philo) and pull all the streams together into one place. This is the beauty of Channels DVR.
My PHP application would then take the output from that back end instance, apply the new channel numbers to it, and output those streams and channel numbers as a new M3U playlist. That new playlist can then be used as an input for the second (front end) instance of Channels DVR. All clients will connect to that front end instance. The back end is only there to provide the streams to the front end.
Putting it All Together
I created an easy to use Docker Compose setup to allow anyone who wants to use this to do so as easily as possible. This guide assumes a working Linux system with both Docker and Docker Compose installed.
NOTE: You can likely adapt this to work on a Windows system. For those of you using Windows, the $ in the command above (and in all of the following commands) is just the Linux prompt. Everything following is the command. I’ve modified the post to change the color of the prompt in all instances below, to avoid confusion.
You’ll likely need to adapt some of these commands to Windows to make this work.
We’ll start in the user’s home directory.
$ cd ~Setting Up Docker Compose
First things first: clone the Docker Compose code to your server, and initialize the directory structure we’ll need to make this all work. We will clone the necessary Docker Compose files from my GitHub repository.
$ git clone https://github.com/crackers8199/channels-dvr-mapper-docker.git
$ cd ~/channels-dvr-mapper-docker
$ sh dir_init.sh
Clone the Channels DVR Mapping Application
Now we’ll bring the channel mapping code into the fold:
$ cd ~/channels-dvr-mapper-docker
$ git clone https://github.com/crackers8199/channels-dvr-mapper.git
There are a few changes we’ll need to make in order to get the app ready to run:
$ cd ~/channels-dvr-mapper-docker/channels-dvr-mapper
$ cp .env.channels .env
Add the Necessary Environment Variables
At this point, we’ll need to modify the .env file we just created. Open your favorite text editor, and at the bottom of the .env file modify the CHANNELS_BACKEND_IP variable by changing the x.x.x.x to your server’s IP address. That’s all you should need to change in order to get this ready to run.
Build the Containers
We’re ready to build the Docker containers that will set this entire thing into motion:
$ cd ~/channels-dvr-mapper-docker
$ docker-compose up --build -d
Go use the bathroom and maybe get yourself a snack or a cup of coffee. You’ll need to give the containers a few minutes to build and get themselves up and running.
Make Sure Everything is Working
Open your web browser, and go to http://<server ip> in your browser. You should see the following screen:

If you don’t see this screen (or if you see an error message), the containers might not be built yet. Give it a minute or two, then refresh the browser.
Channels DVR Back-End Setup
From the screen above, you should be able to click the link to your back end web UI and proceed with adding your sources to the back end. There is something you’ll need to watch out for here, though.
When logging into Channels, sometimes the setup process gets confused by the Docker bridge network. I haven’t yet figured out why this only happens some of the time, but not always – but there’s a workaround. This guide will assume you are using Chrome for this next part. There may be ways to do this in other browsers, but I’m not familiar enough to explain them here.
If you get stuck when you click Log In on the Channels DVR setup page, you can get around it by doing the following:
Channels DVR Setup Workaround
In Chrome, open up developer tools.
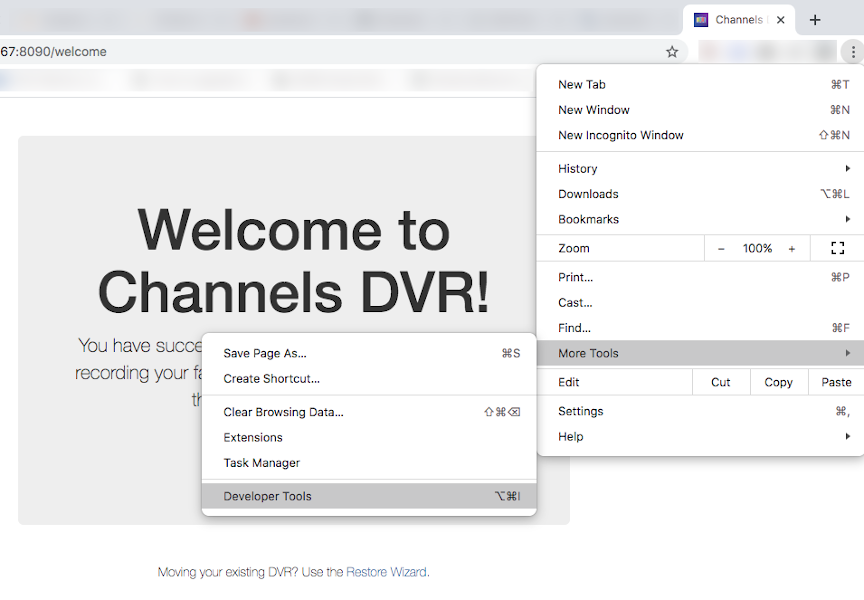
When you click the Log In button, watch the network traffic in the dev tools. Look for the auth/confirm URL that will get stuck in a pending state, and copy the link address.
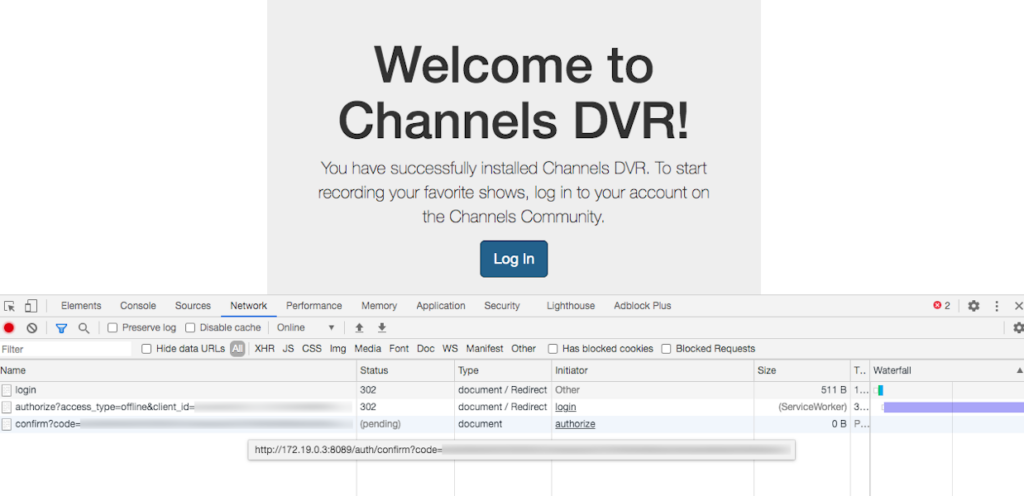
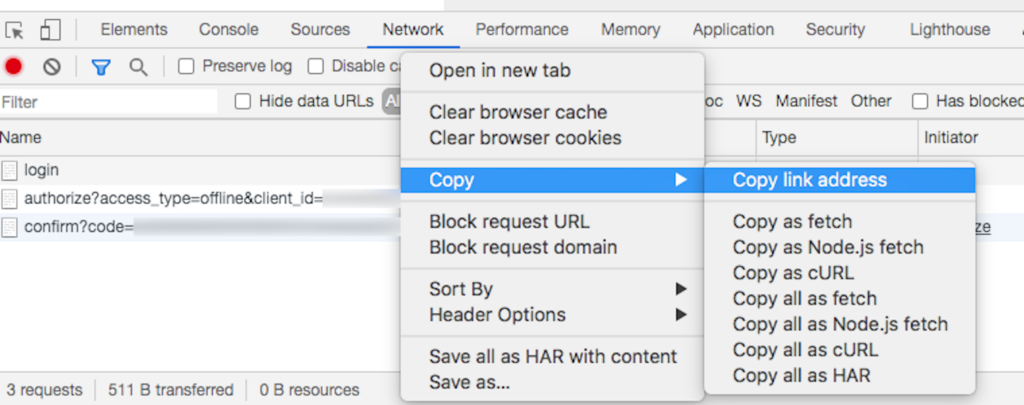
Paste that link into your browser’s address bar, and change the IP address and port number to the IP address of your server, and port 8090.

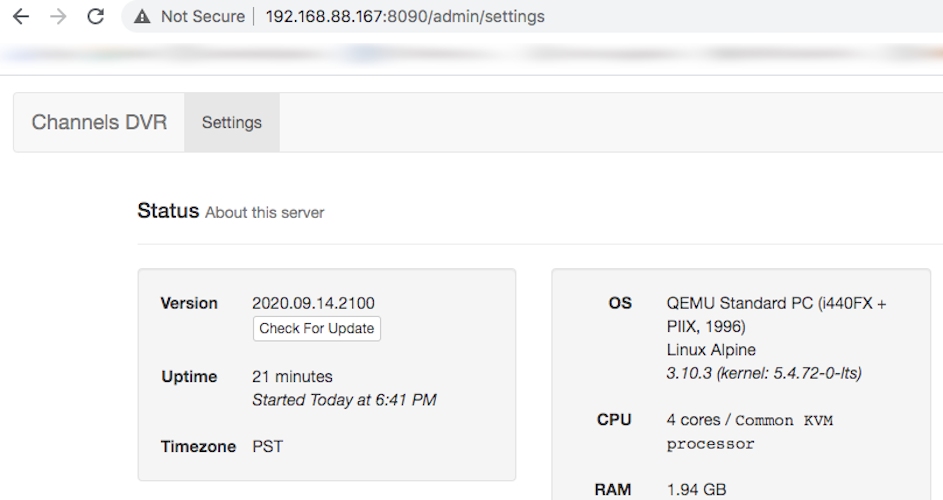
Once you do that, you should end up with the familiar screen below. You can see that in this instance, my server’s IP address is 192.168.88.167.
Add Your Sources
At this point, you can add your sources here. In my case, I’ll add our AT&T TV Now and Philo TVE accounts. Channels DVR has since added an option to allow Locast to use the OTA channel numbers, which is the channel numbering scheme I want – so I’ll simply add that in the front end later.
You can also disable Bonjour and Commercial Skip in the back end, as they’re not needed here. This instance won’t do anything other than provide the streams to the channel mapper and the front end, so we won’t need to connect to it from any clients or have it skip any commercials (as it won’t be recording anything).
Map Your Channels
Now, go back to that same http://<server ip> page we went to when we verified the initial setup. You should now see that a new menu option has appeared at the top of the page to allow you to choose from your back end sources. Select one and work on your channel map!
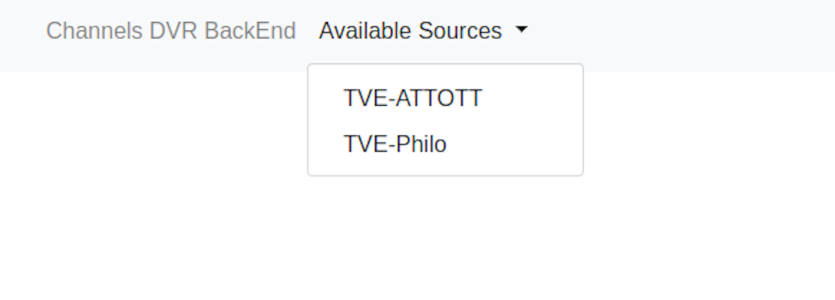
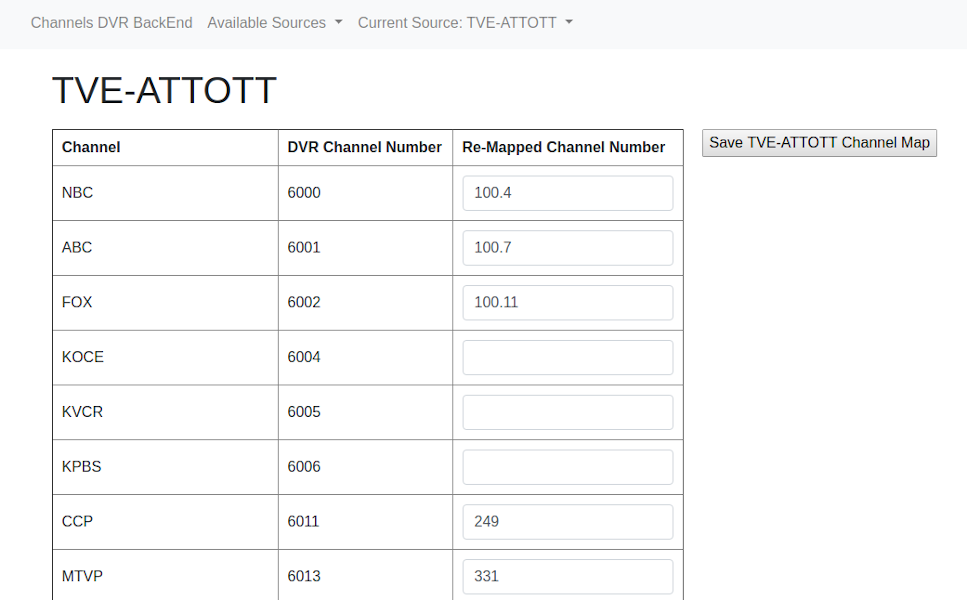
You’ll notice at the top of the screen, there’s a new menu option for the current source. Expand that drop-down menu. You’ll see the ability to view the M3U playlist as well as an XMLTV formatted program guide. We won’t be using the XMLTV guide (channels will auto map the guide for us), but it’s there if you want to use it for any other purpose.
Keep this menu in mind for when you’re adding your sources in the next step. You can copy the link to your playlist and paste it in the source select screen.
Channels DVR Front End Setup
Once you’re satisfied with your channel map, you’re ready to add your sources to the Channels DVR front end instance. This is the instance that will use the default port (8089), and all of your clients will connect to this instance. Instead of adding traditional Channels sources here, you’re going to use their new Custom M3U source to read the playlists the mapper application will have created.
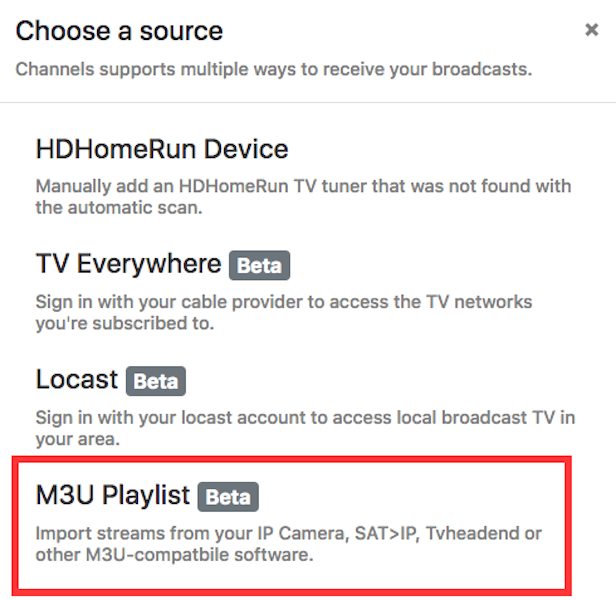
The options for the M3U playlist will look like this:
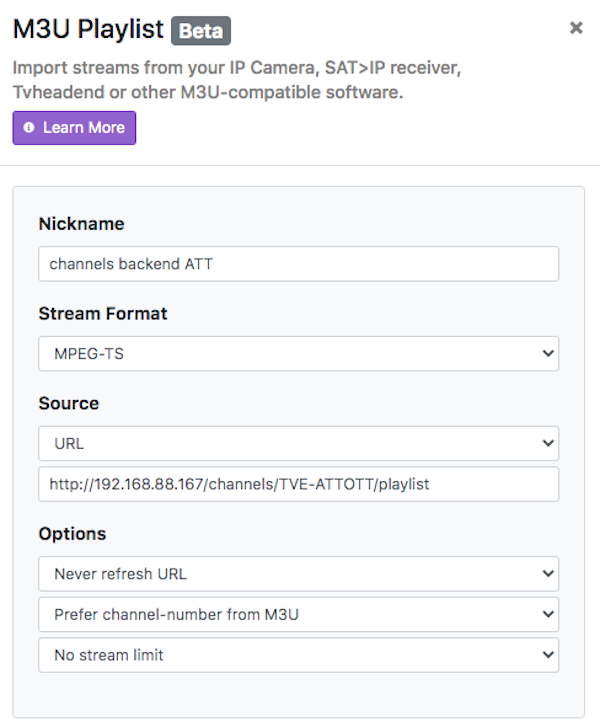
You can name the source whatever you like (I use channels backend <source name>, to keep things simple).
The stream format should always be MPEG-TS when using sources from the Channels back end.
The source is URL, and the actual URL is the link you copied above from the drop-down menu.
The other options can be changed as you see fit, but you always will want to prefer the channel number from the M3U. Turning that off would defeat the entire purpose of this exercise!
See more of our Home & Tech Project posts and Tech Product/Accessory reviews.
See all Reviews in our Product Review Portal.
Step 9,273,498,356: Profit
I know this has been a really long and arduous process getting this working, but now you can configure your clients to connect to this Channels DVR server as you normally would. If everything was set up correctly, you should now see all of your channels with the channel map you defined earlier.


hey Matt seeing if the channels dvr server can be installed on a remote server. I got slow slow bandwidth at home. was hoping to get a ups and install it on there. I use to do that a long time ago. seeing if you can help thanks
Theoretically, sure – you’d just have to make a few tweaks to the setup I used. Are you wanting to install the entire Docker stack on that remote server, or just part of it?
I’m getting this error in the docker container
to be honest, i’m not sure how that would happen. that looks like you’re somehow not getting the app copied into the container (the line about the FQDN is normal and harmless, but the lines about the directories not existing is a problem). i’m wondering if maybe you have files in the wrong spot somehow.
what step in the process are you getting to when you first see this pop up? immediately after building? my suggestion would be to completely start over and follow the process from the start, making sure you have all of the files in the same location the documentation describes…i’m happy to provide any help i can.
Worked for me in the past but now on the latest release of channels i can not get the local php pages to come up. tried several times on umbuto 20 and 18 same issue. Any thoughts?
unfortunately, i’m not sure…it’s still working fine for me. when you say you can’t get the local php pages to come up, is there some sort of error you’re seeing when trying to load them?
The front-end container mapper keeps rebooting. Also got the same error about var/www directory. I corrected those directories but the container keeps rebooting.
is there anything in the logs when it reboots? i haven’t seen anything like that, mine is still working just fine…when you say the “front-end container mapper” do you mean my php app container that does the mapping, or the channels frontend docker container?
ok back at it again. Fresh install on Ubutnu and get the error that channel mapper container is restarting:
c53609b01a37 channels-mapper “docker-php-entrypoi…” About a minute ago Restarting (2) 21 seconds ago channels-mapper
There for i get on base website. I can look further but not sure how to get the logs of the docker image.
Followed your install line by line except one, Had to ad sudo infront of the container build script.
I have the scirpt output saved if you want to take a look
Hi! Lora here, sorry, moving this post over to our new site, give us another day or so for Matt to get back to you! 🙂
Hey Matt, I just did the full step by step install. After the containers are started the channels-mapper stops immediately and I get this error:
driver failed programming external connectivity on endpoint channels-mapper. Error starting userland proxy: listen tcp4 0.0.0.0:80 bind: address already in use.
Please help
that indicates that there’s some service on your machine already running on port 80. do you have any other containers or services on that machine that are running a web server?
Yes I am running my Plex Media Server and my Home Assistant in a VM. I’m pretty sure none of them are using port 80 though. This is all on a Synology NAS.
It looks like Synology Drive Server uses port 80. Is there any way to change the port instead of having your php app using port 80?
Ok sorry for all these replies, lol. I stopped all services that are currently running on my Synology NAS and then re ran the install process and I still get the error about port 80 still being already used. I just need to some how change the port for your php app, is that possible? Thanks