IMPORTANT UPDATE (12/28/2023): There are reports on the TMC forums that scrolling through Tesla SiriusXM Satellite Radio favorites with the steering wheel scroll button is broken again after the holiday update. I can confirm that this still works as of 2023.44.1. However, forum users indicate it is broken as of 2023.44.30.5. I would not update past 2023.44.1 if you can avoid it. Last time, it took Tesla over a year to fix this issue.
Tesla SiriusXM Satellite Radio – Ditch the Portable
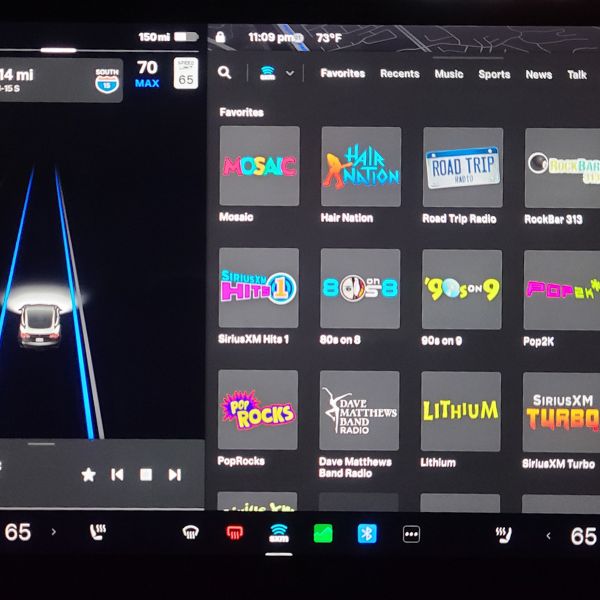
A few years ago, I wrote detailed instructions on how to install SiriusXM Satellite Radio in your Tesla Model 3. The downside was that this was accomplished via an add-on portable tuner. As of August 2022, you can now install SiriusXM Satellite Radio into your Model 3 (or Model Y) and have it integrated with the main screen inside the car.
The beauty of this option is that you don’t need to have an external tuner. Everything is handled by the car itself on the main display. It also means you don’t need to drill any holes into your console.
NOTE: this will only work if your Model 3 (or Model Y) are Intel Atom models. If you have the new AMD Ryzen MCU, this will not work (yet). Several forum members are still trying to determine why this is, but as of now a solution has not been found.
UPDATE (12/9/2023): HUGE NEWS! Several forum members have indicated that this now does in fact work on AMD Ryzen cars. I cannot personally confirm this, as my Model 3 is an Intel model – however, I trust the word of these forum members, as they have all been a huge part of helping develop this mod in the first place. The initial reports indicate that Tesla software version 2023.44.1 or later is required to enable support for this in AMD cars.
Full Parts List
Here is a full list of parts you’ll need to complete this mod on a Model 3 (parts for the Model Y may vary slightly):
- one of the following Tesla SiriusXM Satellite Radio tuners (This is the hardest thing to find, as most Service Centers won’t sell it to you unless you have a Model S or X on your account. You may be able to get lucky by finding one that will sell it to you, or you can likely find one on eBay.)
- Tesla part number: 1143716-00-C (old Model X tuner)
- Tesla part number: 1622932-00-B (Plaid tuner)
- The tuners listed below have been confirmed working with newer Ryzen vehicles, and will probably also work on any Intel car. Your mileage may vary, of course.
- 1143711-00-B
- 1143711-00-C
- 1622932-00-A
- SiriusXM Antenna (I highly recommend using the SiriusXM OEM branded antenna linked to here)
- fakra to SiriusXM antenna adapter
- Tesla part number: 1079735-00-A (Model 3 FM antenna adapter – optional, only needed if connecting both sides of the factory FM antenna)
- female to female fakra adapter (optional, only needed if connecting the ribbon cable and second FM amplifier – runs from the fakra connection on the amplifier to one side of the dual fakra going into the tuner)
- one of the following antenna adapters (optional, only needed if connecting the FM radio):
- dual fakra to two single fakra adapter (needed if connecting both sides of the FM radio)
- dual fakra to single fakra adapter (if connecting only the amplified side of the FM radio, but not the ribbon cable)
- three male-to-female jumper wires, similar to these (optional, only needed if connecting the ribbon cable to second antenna amplifier)
- Tesla part number: 1079749-00-D (Model 3 FM Radio tuner – optional but recommended, useful if you want to keep your original tuner intact and use the new one for the housing swap. Easily found cheap on eBay.)
Estimated Cost (as of December 2023)
You can expect to pay around $250 for the parts needed for the absolute minimum setup. This would include installing the SXM tuner with no FM antenna connection.
The full modification, which would include both sides of the FM antenna connected, would cost around $350 in parts.
If you choose to purchase a spare Model 3 tuner to use for the housing swap, expect to spend around $50 for that tuner on eBay. Do not buy this directly from Tesla. As of late 2022, they were charging around $600 for the brand new tuner, which is absurd.
Accessing the FM Radio Tuner
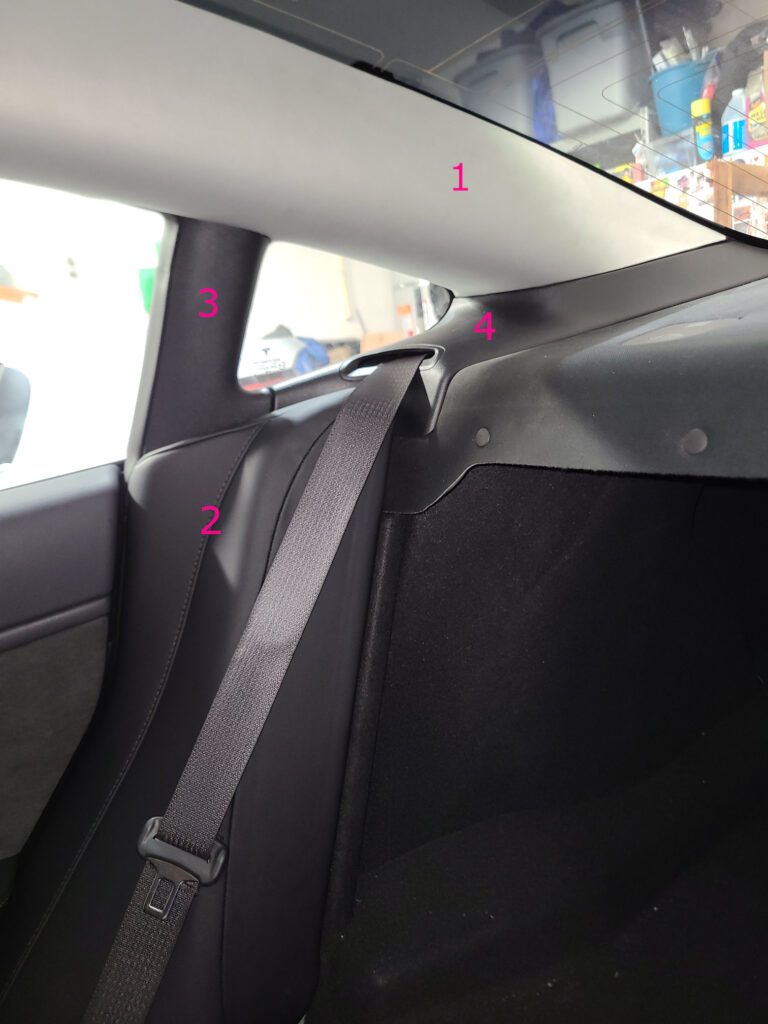
The following video shows how to remove the rear C-pillar cover to access the FM radio tuner. I’m in the process of creating my own video of this install, and I will add it here when it is finished.
You can also remove several additional pieces to make it easier to route the wiring and access the tuner. First, remove the side seat cushion. Then, remove the vertical window trim panel. Once those two pieces are removed, it will be easy to slide out and remove the seat belt trim. You can access everything you need without removing those three pieces, but removing them will make your job a lot easier (and they’re very simple to remove and re-install). It might be easier to remove the seat belt trim before the vertical window panel (the same may apply in reverse when putting everything back together). Your mileage may vary.
Model S / Model X SiriusXM Satellite Radio Tuner to the Rescue
Although Tesla does not offer SiriusXM as an available option on the Model 3 (or Model Y), they do offer it on the Model S and Model X. Several intelligent TMC forum users discovered that the form factor for the Model S/X Tesla SiriusXM Satellite Radio tuner is the same as the tuner in the Model 3.
There are several models of Model S and Model X tuners available. The ones you’re looking for are either 1622932-00-B (the new Model S/X Plaid tuner), or 1143716-00-C (the older Model X radio tuner). There may be other models that work, but these are the two that forum users have confirmed as working.
The mounting plate for the Model 3 is riveted to the housing. It cannot be easily removed, so It’s not as simple as swapping the tuners. In order to make this work, you need to actually take the radio tuner apart. You’ll need to swap the circuit board for the board from the Model S/X tuner.
Disconnecting and Removing the Model 3 FM Radio
Carefully disconnect the ribbon cable and white antenna connector just below that. Disconnect the ground wire harness at the bottom left, if present. Unclip it from the bottom of the housing as well.
Also, carefully disconnect the radio wiring harness from the other end. TIP: To disconnect the harness, use a small flathead screwdriver. Insert the screwdriver at the bottom of the harness, but inside the connector. There is a small lever that you must use the screwdriver to raise slightly. Slide the harness out to the right once you have raised the lever.
Once you have disconnected all the wires, you can unbolt the radio. There are three 10mm bolts: one on the top left, and two on the right side.
Disassembling the SiriusXM Satellite Radio Tuner / FM Radio Tuner
Luckily, this isn’t nearly as difficult as it sounds. Taking the tuner apart is as simple as removing six T8 screws, and then inserting a flathead screwdriver into the side of the tuner and twisting slightly. The top will pop right off. This procedure is the same for both the Model 3 tuner and the Model S/X tuner.
Again, there will be a video forthcoming of how simple it is to disassemble the tuner itself.
Once you have the tuner case separated, you can remove the boards from each tuner. The only modification needed to fit the Model S/X board into the Model 3 tuner housing is that you will need to break off one small tab on the antenna connection end.
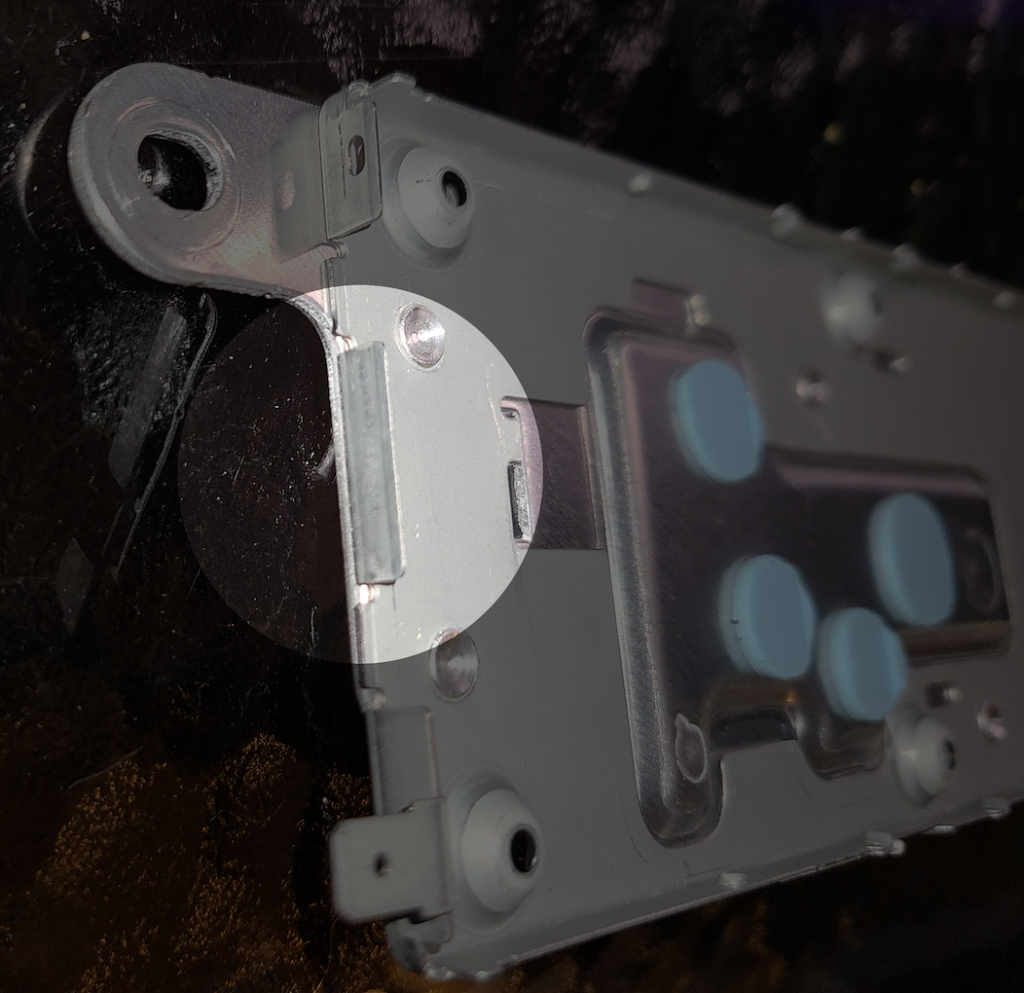
One thing to note is that the part of the housing that acts as the heatsink (the side against the mounting plate) is slightly different on the Model 3 tuner. There will be two chips on the Model S/X board that will not have an indented part of the case to sit on. You will need to add additional thermal paste to these areas, to make sure they have a good connection to the case. I used three layers of thermal paste on these two chips.
Installing the modified SiriusXM Satellite Radio Tuner
Once you’ve modified the tuner and transferred the satellite radio tuner board to the Model 3 FM radio housing, you can mount it back inside the car. Use the same three bolts you removed earlier. NOTE: I have decided to leave the top left bolt out, as it pushes against the satellite antenna connector. It is still possible to install this bolt and also have the satellite antenna make a solid connection. You can decide how you’d like to handle this when you do the install.
Installing and Routing the SiriusXM Satellite Radio Antenna
In my previous post, I left the SiriusXM Satellite Radio antenna on the rear deck. While this works, for a more integrated solution, I decided to install it on the exterior of the car.
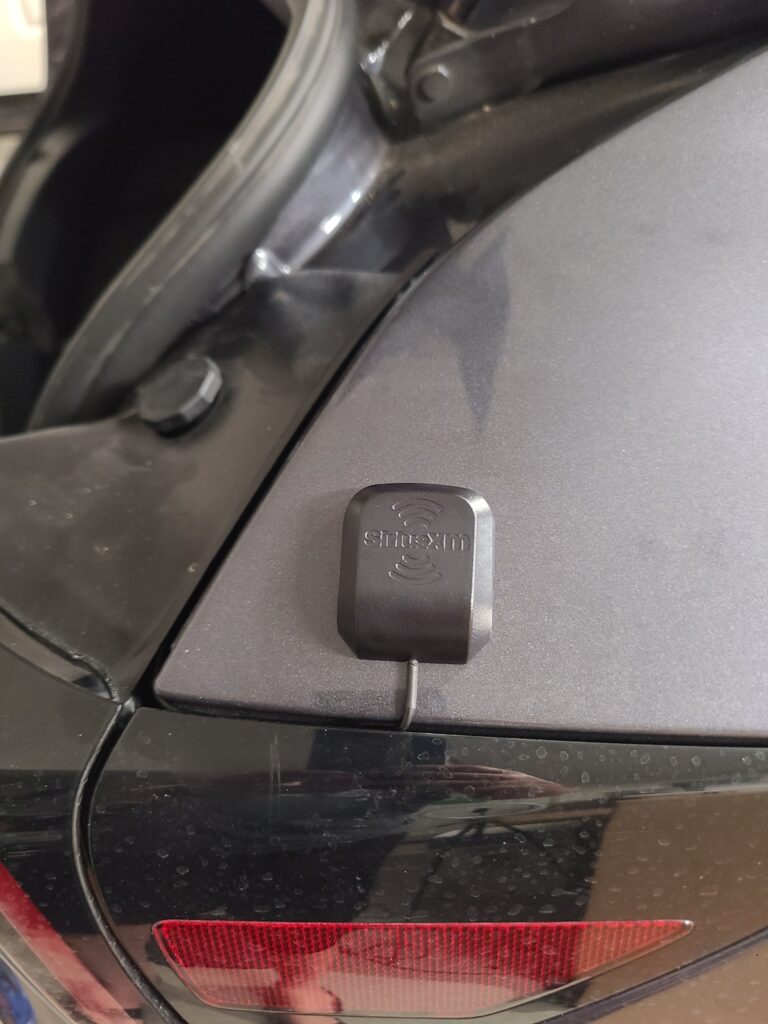
In my opinion, the easiest place to put the antenna is on the rear passenger quarter panel (opposite the charge port), as seen above. You can easily tuck the wire under the trim, under the trunk weather stripping, and route it into the trunk. Once inside the trunk, there is a small hole you can feed the wire through. This will make it easier to route it up to the Tesla SiriusXM Satellite Radio tuner. If you’ve removed all of the pieces we talked about earlier, this is much easier to spot.
You will need this antenna adapter to connect the SiriusXM Satellite Radio antenna to the tuner. The top left connector is for the SiriusXM antenna.
I can confirm after several months of driving with the antenna installed on the exterior of the car that this is a much better solution. The reception is much better with the antenna outside of the car. I did test the antenna on the roof as well, but there was not a noticeable difference in reception. It isn’t worth trying to route the antenna anywhere else, when the rear quarter panel is such an easy install.
OPTIONAL: Connect and install FM Radio Antenna
If you want to include FM, you can use this antenna adapter to convert the dual Fakra connection from the Model S / Model X tuner to two single Fakra connectors supplied by the Model 3.
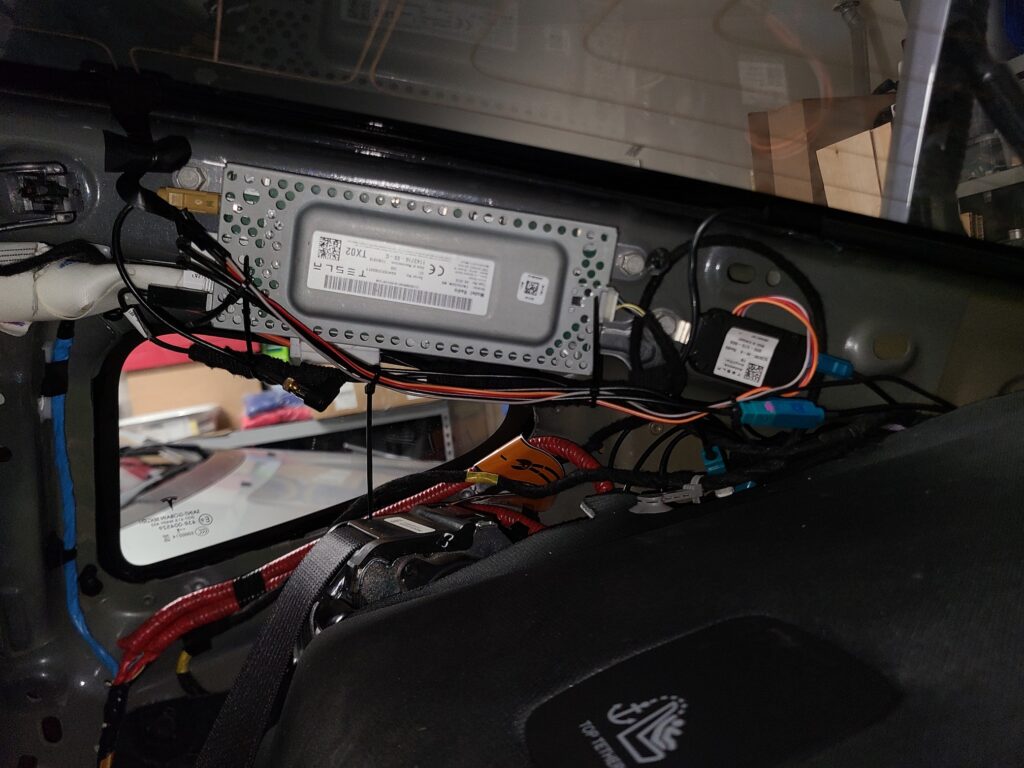
You will also need several jumper wires, as well as an additional Model 3 Antenna Amplifier and this female to female Fakra adapter, to connect both sides of the FM antenna. The additional antenna amplifier mounts easily on the bottom right mounting bolt for the tuner.
Route the jumper wires from the ribbon connector to the ribbon input on the amplifier. Take note of the polarity when connecting them (make sure you’re connecting them in the correct order). Then, connect the Fakra end of the amplifier to one side of the Fakra antenna adapter you installed on the tuner using the female to female Fakra adapter. The other antenna connector goes to the other side of the Fakra antenna adapter on the tuner.
Below, you can see a picture of my finished wiring before I decided to ditch FM and remove the top left bolt. Note the second antenna amplifier mounted on the bottom right. (UPDATE ON THIS BELOW)
FM Reception Notes
FM reception has been hit or miss so far. Sometimes, it’s flawless. Other times, I lose it completely. I’ve still been experimenting with this occasionally, but at the moment I’ve just decided to disconnect it completely and remove it from the sources list. I rarely listen to FM. Eventually, I’ll figure out a way to make it solid – but for now, it’s just not that important to me.
UPDATE, MAY 2023: I have since reconnected the FM antenna with the second antenna adapter. We recently went on a road trip that I wanted FM coverage for. It still works just as it did before. The top left bolt is still not installed.
UPDATE, SEPTEMBER 2023: I think either I had a loose connection previously that made the FM reception unreliable, or Tesla has made improvements to the software. My FM reception has been flawless for months now, since reconnecting everything for our road trip. Fingers crossed that Tesla doesn’t break this in a future update as they so often do.
Reinstalling all of the Trim Pieces
If you only removed the C-pillar cover, your task here is pretty simple. If you removed the additional pieces, though, re-install the trim in this order:
- window panel vertical trim
- seat belt trim (you may have better luck reversing these two, YMMV)
- side seat cushion
- C-pillar cover
Everything should fit together easily, if you do it in that order.
Once you have everything put back together, reboot the car by pressing both scroll buttons on the steering wheel. Hold them in until the main screen shuts off, then wait for the car to boot back up. At this point, the car should recognize that the SiriusXM tuner is installed.
A few Tesla SiriusXM Satellite Radio annoyances:
- The Tesla SiriusXM Satellite Radio UI is, in a word, horrific. When you choose a favorite station to listen to, it opens up a whole other menu of “related content,” which then forces you to go back to your favorites list to select another favorite.
- The audio quality via SiriusXM is not the greatest. Occasionally, there will be static and / or popping, or clipping sounds mixed in with the audio feed. I have yet to be able to figure out a pattern on this, and it happens on my car now on both SiriusXM as well as FM. This seems to be a known issue based on several forum posts. Sometimes, on a new software version install, it will go away for a short period of time. It always seems to return at some point, though.
UPDATE, SEPTEMBER 2023: This also seems fixed. Recent updates have greatly improved the sound quality, and I haven’t noticed any static for a few weeks now. This one I also fully expect Tesla to break again at some point in the future, as they have done several times over the 13 months I’ve had this mod installed.
Tesla SiriusXM Satellite Radio Favorites (horrific)
- Once you have favorites set, the car is supposed to cycle through these favorites when you use the left scroll button on the steering wheel. However, there is currently a bug in the system software that causes it to forget that favorites exist after some period of time. Once this happens, the scroll wheel will now advance channels sequentially, rather than scroll through your favorites. Several forum members are in the process of trying to get Tesla to fix this.
UPDATE, MAY 2023: Tesla has finally fixed this – sort of. The steering wheel button now cycles through favorites if you’re on a favorite, but only the first 20 (or so). I say “or so” because the number of channels it will cycle through seems to vary from reboot to reboot. If listening to a favorite channel, the scroll wheel cycles through favorites. If on a non-favorite channel, it cycles sequentially until you hit a favorite channel, then switches to cycling through favorites.
UPDATE, SEPTEMBER 2023: This seems mostly fixed, now. Subsequent updates have led to this working completely, after I removed and re-saved all of my favorites. The steering wheel button cycles through all of them, and it survives an overnight power down and a double-scroll reboot. I’m hopeful this will stick.
UPDATE, DECEMBER 2023: As expected, this is broken again as of 2023.44.30.5 (the 2023 holiday update). Tesla’s software release and testing process is, quite frankly, embarrasssing for a company of this size.
Final Thoughts
Now SiriusXM Satellite Radio is built into the car, with no external tuners or portable radio units. Everything is integrated into the main display, and run by the car’s MCU.
Despite those minor annoyances, I would still highly recommend this install method over the portable unit method. Remember, this WILL NOT WORK if you have a new AMD Ryzen MCU.
UPDATE (12/9/2023): Again, several forum members have indicated that this now will work with AMD cars. I cannot personally verify this, but I trust the forum members who have confirmed that it will work with AMD cars. Feel free to read the related forum posts to get additional information if you so desire. The initial reports indicate that Tesla software version 2023.44.1 or later is required to enable support for this in AMD cars.
See more of our Home & Tech Project posts and Tech Product/Accessory reviews.
See all Reviews in our Product Review Portal.
Disclaimer: These instructions work for me and have worked well for me for an extended period of time while having SiriusXM Satellite Radio installed in my Model 3. I am not responsible if you attempt this install and botch something, and end up causing damage to your car or your XM unit. Attempt this at your own risk. Please feel free to ask questions in the comments here or consult a car stereo installation expert in your area if you have any concerns or issues.

Where’s the video?
Is there a video on how to do this?